2: Description of finished yoyo:
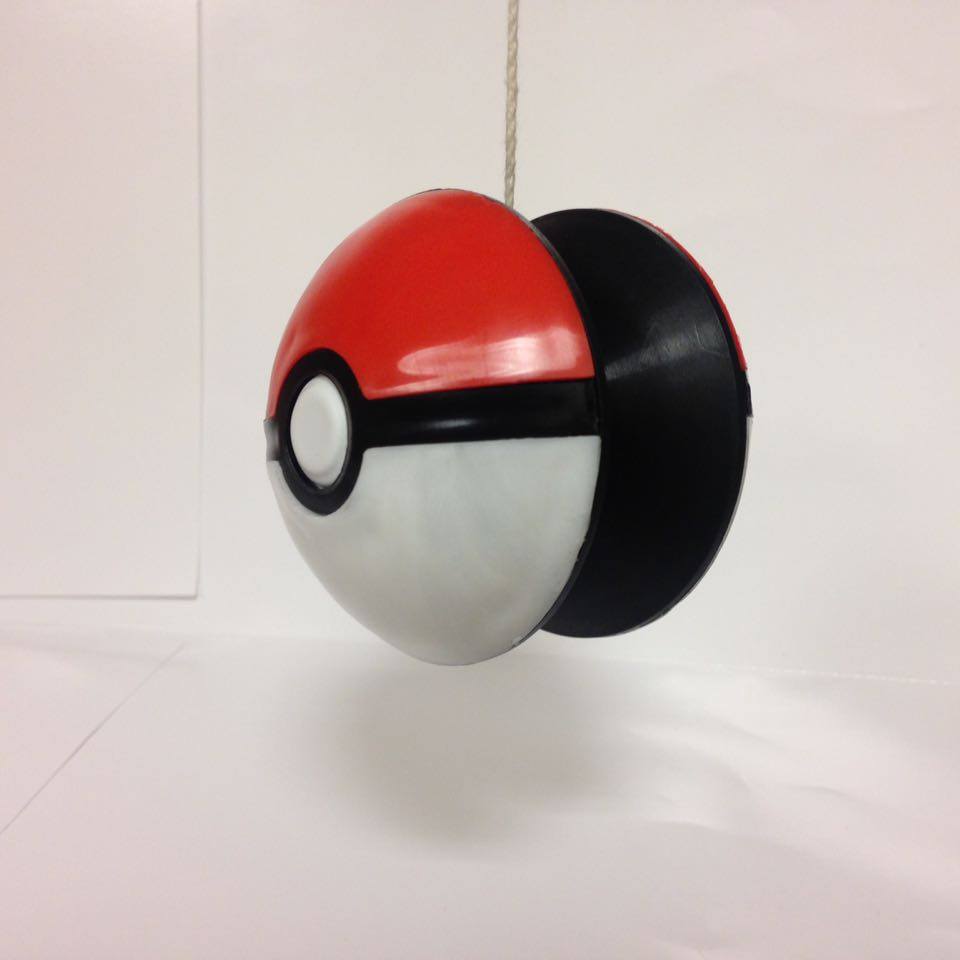
Our team designed a pokéball yo-yo, complete with the classic spherical pokéball shape, striking red, white and black colors, and even a pressable button on one side. The yo-yo is designed for optimal performance, sloping the surfaces between the two yo-yo halves and adding weight to both sides with shims.
We designed five unique injection molded pieces and one thermoformed piece. From left to right, on the image below, the pieces are the “ring with button” (injection molded), “button” (thermoformed), “face with button” (injection molded), shim (steel), “base” (injection molded), nut, screw and bushing, nut, base, shim, “face without button” (injection molded), and “ring without button” (injection molded).
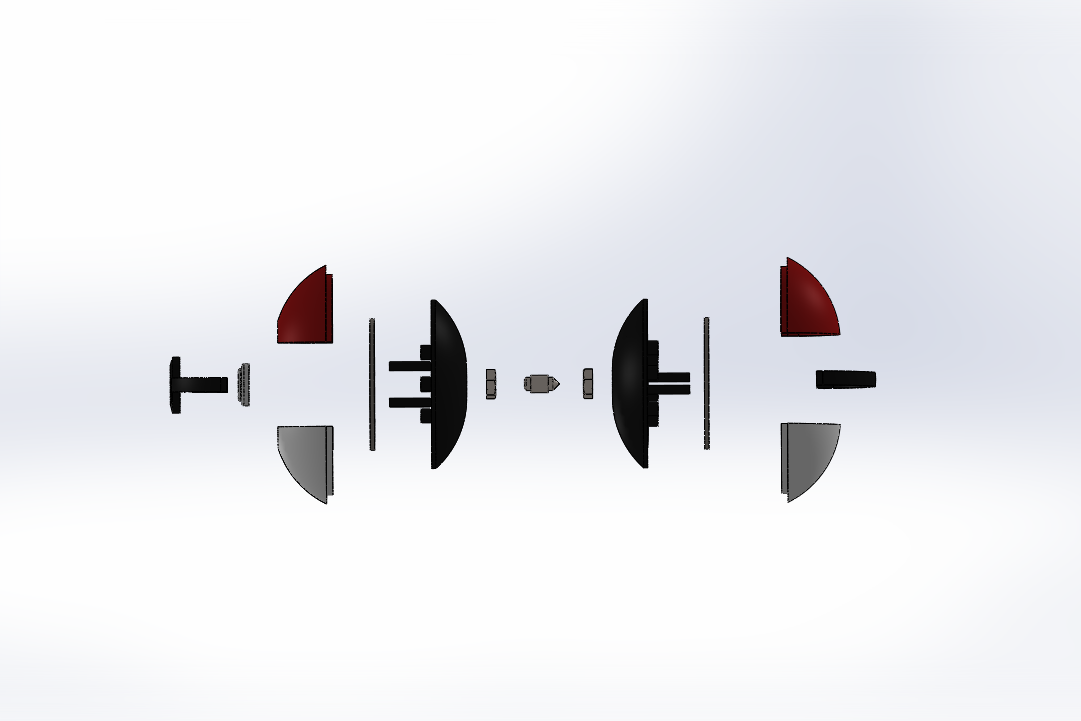
An additional view shows greater detail on each individual component:
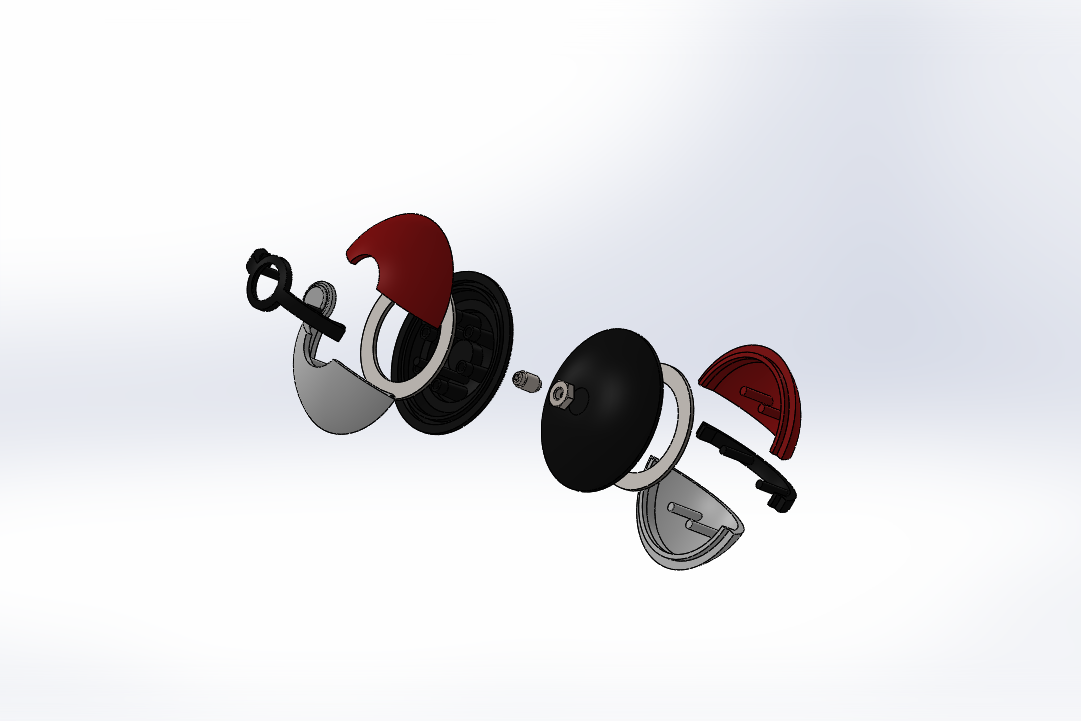
All injection molded pieces on the yo-yo connect to the base pieces through long pins (a press fit) and in slots around the edges (snap fit). The use of two different fit types (snap and press) for each injection molded part to the base not only ensures durability over time, but also improves aesthetics, as the snap fit around the edges guarantees that the face pieces will hold tightly to the base piece, without a development of a gap. The thermoform piece fits into the circular hole in the ring with button piece and is supported at its edges by the two longest pins on the base piece (note that the two base pieces are identical; on the side of the yo-yo without the button, these long pins are not engaged).
Our tooling design for injection molding was unique in that it utilized the ejector pins in the injection molding setup itself to create the long, thin pins extending from the base and face pieces for press-fits. We also explored unique tooling options with the thermoformed button; we wanted to create a part which was smaller than could be cut with the normal 2.008 die tool, so we added circular ridges around the button shape on the thermoforming die which we could use to position the plastic within a steel punch to quickly and accurately cut out the button shape in the appropriate size and shape.
While injection molding the face, ring, and base pieces, our initial design assumption that we would see approximately uniform shrinkage over all parts (backed by the flexibility in assembly provided by the long press-fit pins) turned out to be correct; after beginning test injection molding runs, the only additional changes to our tooling required for injection molded pieces was a slight widening in the ring pieces, which was purely for aesthetics (though we did some fit-related remachining for our thermoformed piece). Additionally, we found that the similarities in shape between the button and non-button sides allowed us to use the same injection molding parameters for both.
After successful assembly of our prototype yo-yos and a bit of performance testing (our yo-yo reaches an angular velocity of 6000 rpm!) we are excited to present to you the Yo-yo Bros Pokéball.
The parts we made using FDM include:
- The two external halves that make up the exterior of the yo-yo. The front side (with the button) is different from the backside (no button). Total, this is 4 parts but only 2 unique parts because the top and bottom of the front and back faces are identical.
- The black curved parts that make up the interior of the yo-yo. Total, this is 2 parts (2 halves) and these are the same.
- The black horizontal strip on the back. This is 1 part.
- The black strip on the front (different from the back). This is 1 part.
In total, we used FDM to make 8 parts and 5 unique parts. We decided to use FDM to create these parts to ensure that parts can fit together snugly and to ensure that we have accommodated for tolerances in the fitting together of our parts. By having the physical parts to fit together, we can see the areas that we will need to refine to different dimensions or tolerances.


It is difficult to make a comparison between the FDM parts and the injection molded parts, because the quality is so different. We have much smoother curves and contours with our injection molded parts, but do have a bit of shrinkage still present. For example, there are still small indents on the inner face of the base piece, yet when compared to the FDM part we do not have the poor resolution that the printer has, resulting in a very smooth curve. The pokeball halves also suffer from a slight bit of dimpling on the outer surface which is not present on the FDM parts, but again the injection molded parts are much smoother. A similar comparison can be made for the horizontal parts.
One big different between the parts is that the snap fits on the FDM parts would not work at all directly out of the printer. We had to do some post processing to get them to fit together, something which we didn't have to do with the injection molded parts. This is critical in the production of the yo-yos, and we are satisfied with the way in which our injection molded parts fit compared to the FDM parts.
In terms of opportunities for improvement, one thing that immediately comes to mind is that we could use tighter tolerance ejector pins. We had flash issues where the plastic was coming into contact with the ejector pins, indicating that the ejector pins or reamer used were not as precise as we would like. Along with this, re-positioning of the gates would be another area for improvement, since it did impact aesthetics slightly. Adding ribs to the base part would stop the bowing out of the posts which the pegs are inserted into. Along with this, taking time to remove the dimples on the outer surface would also improve the exterior aesthetics.
3. Table of yoyo specifications vs measured specifications:
Design Specifications
Part Name
|
Feature
|
Design (in.)
|
Avg (in.)
|
Max (in.
|
Min (in.)
|
STD
|
Variation
|
Base
|
Press Fit ID
|
1.900
|
1.992
|
1.996
|
1.982
|
.0027
|
4.842%
|
Pokeball Half (No Button)
|
Location Pin Diameter
|
.1250
|
.1251
|
.1260
|
.1240
|
.0003
|
.0800%
|
Pokeball Half (Button)
|
Location Pin Diameter
|
.1250
|
.1248
|
.1270
|
.1235
|
.0006
|
.1600%
|
Divider
(No Button)
|
Band Width
|
.2300
|
.2279
|
.2295
|
.2265
|
.0007
|
.9130%
|
Divider (Button)
|
Button ID
|
.5575
|
.5829
|
.5870
|
.5710
|
.0029
|
2.490%
|
Button
|
Outer Diameter
|
.6000
|
.5879
|
.7130
|
.5600
|
.0454
|
2.017%
|
Base
For this part we measured the inner diameter of the press fit ring. With a variation of almost 5% this dimension changed quite a bit from its intended value. The difference is due to shrinkage of the part while cooling. This could have been remedied by making this (and probably the outer diameter as well) slightly larger features in the mold so that shrinkage brought them closer to our intended value. We did account for about 2% of shrinkage, but were apparently off by another almost 5% for this particular measurement. The part is still entirely effective, however, because the halves and the band that have to fit into this press fit shrunk by similar amounts and the fit is still functional.
Pokeball Half (No Button)
We measured the diameter of the location pins on this part. These pins interface the holes created by the ejection pins in the base. The variation for this part is only .08%, meaning we were able to get very close to our intended value. This is because the shrinkage for this post was easier to account for than for the larger rings in other parts. The pins are so small in diameter that shrinkage doesn’t affect them as much as it does other features on the yo-yo.
Pokeball Half (Button)
The same feature was measured on this half as on the non-button side. However, in this case we found a variation double that of the non-button half. This could be explained by slight differences in the materials or in other subtle conditions since the production runs were done at different times, and since the measurements are still so close to their intended values. This is due once again to the size and predictability of shrinkage of this feature.
Divider (No Button)
We measured the width of the band itself because this is the most critical dimension of this part. If the band is too narrow then gaps will form on the face, and if it is too wide then the parts won’t fit together at all. We found a variation of .9% from the part’s intended width. This is within an acceptable range, and after assembly we have found that our yoyo faces fit together nicely across this band. The slight difference from the intended value here is also due to more shrinkage than expected. The part is thin and wide, which leads to a large amount of shrinkage.
Divider (Button)
For this part we measured the inner diameter of the ring that will hold the button in place on the face of the yoyo. The variation was fairly large at 2.5%. This is because of the shape’s tendency to shrink as well. The ring around the button is fairly thin and large in diameter, so it makes sense that this inner diameter would enlarge as the material is pulled outward towards the opposite edge. The button is still able to be framed nicely within the ring, so the shrinkage is once again not too much of a problem.
Button
The outside diameter is the most important value for this part. This is what butts up against the inner edge of the ring in the divider mentioned above. We found a variation of just over 2% from our intended value due to more shrinkage of the thermoformed plastic than expected. This could have also been accounted for better in the design, but the buttons do still fit within the rings as intended.
Part Name
|
Feature
|
Production Spec (in.)
|
3σ Value (in.)
|
Variation at 3σ
|
Base
|
Press Fit ID
|
1.900
|
.0030
|
.1579%
|
Pokeball Half (No Button)
|
Location Pin Diameter
|
.1250
|
.0009
|
.7200%
|
Pokeball Half (Button)
|
Location Pin Diameter
|
.1250
|
.0009
|
.7200%
|
Divider
(No Button)
|
Band Width
|
.2300
|
.0021
|
.9130%
|
Divider (Button)
|
Button ID
|
.5575
|
.0030
|
.5381%
|
Button
|
Outer Diameter
|
.6000
|
.0300
|
5.000%
|
4. Summary of cost analysis:
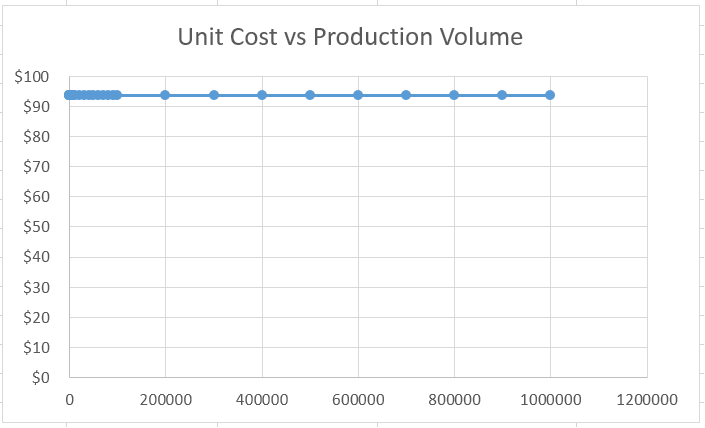
After performing a cost analysis on the yoyo, it was determined that the cross-over volume between additive manufacturing and the methods we used in 2.008 occurred at about 425 units. Now, this is much more than we made in the class, but in reality we were just getting started with our production run. We had invested all the time in the tooling, but had only used it for a small portion of its life.
Shown below (apologies for two separate plots) are the unit cost vs volume produced for the 2.008 methods and additive manufacturing, respectively. You can see how high the initial investment is for the method we used in 2.008 compared to having a third party 3D-printing company manufacture the yo-yos. This being said, there is some tweaking to be done with the cost models to get a more accurate representation of where this crossover quantity is. Better quotes should be received from additive manufacturing companies, and more explicit guidelines on what we are actually "paying" for in the 2.008 lab should be set, such as the machines or labor.
This all being said, the graphs still do show the general, very important principle that if you are producing in very small quantities it makes more sense to use additive manufacturing, but it quickly becomes cheaper at higher volumes.
2.008 (injection molding) method:

Additive Manufacturing Method:
5. Reflection on yoyo design:
The 008 shop’s tooling only limited our final product in a
few ways. First, we were unable to get some cuts deep enough because the
available 1/16th endmill was slightly too short. Secondly, we were
getting fairly rough final passes on some of our circular molds because of how
worn down some of the available tools were. Finally, the shop was not equipped
with a die small enough to effectively cut our thermoformed button.
The lack
of a long enough 1/16th endmill mainly affected our two horizontal
divider core molds. Since the core mold’s main body extends out from the base
of the block of aluminum, cutting deep down into the mold to make the male snap
fit parts put us in danger of hitting the base of the endmill against the mold.
Dave Dow kindly suggested that he would purchase a longer endmill for us but
instead we decided to redesign the depth of the snaps to fit the tools we had
available. This simply involved not cutting as deep into the mold, therefore
sacrificing a much tighter edge fit for a safer machining process. We were able
to compensate for the smaller edge fit by then designing the pin system that we
used for the final design.
A much
less acute issue that we faced was the rough finishing passes we were getting
in some of our molds from the lathe. This mainly affected our universal cavity
mold, which is nearly completely machined on the lathe. The issue probably
stemmed from the large number of uses the machine and tools were seeing this
semester, which is completely understandable. In order to combat this issue, we
simply rubbed a heavy dose of Scotch-Brite along the inside of the mold to
smooth the surface.
Finally,
for cutting the thermoformed piece, we did not have a die that was small enough
for our button, and we did not feel we had the time to make one. Our solution
to this problem was to use the sheet metal stamper in the lab as a thermoformed
piece die. This solution allowed us to quickly cut out our pieces and get them
into the yoyos without producing a brand new die.
We have
several ideas on how we would adapt our yoyo for mass production that will make
assembly easier and make the final product look better. First, we would improve
the tolerances on our press fit pins in order to make assembly easier.
Secondly, we would put more thought and effort into the production of our
button mechanism. Finally, we would implement interior gates, which would
vastly improve the quality of the edges of our yoyos.
To
improve our assembly time, we hope to improve the tolerances on our press fit
pins. This includes better reaming of the ejector pin holes on the base piece,
which should reduce flash that tends to get in the way of the male pins when
pressing the outer parts into the base. The resistance we sometimes got when
pressing the pieces together could even cause some pins to break.
We also
plan on redeveloping our button mechanism, which tended to have issues with
falling into the yoyo’s body. This is because if the button is pressed to hard
or at an angle perpendicular to the two posts holding it up, one of the posts
would sometimes come out from underneath it. This kind of defect is a difficult
one to fix once it has happened, because the entire yoyo needs to be disassembled
once it happens. Our planned solutions are to either add two more posts on the
two sides of the button that currently don’t have them, as well as to move
those posts closer to the interior of the button, with a slightly increased
height for a more rigid button press and a tighter grip to the outside wall.
Finally,
we hope to add interior gates to our molds to improve outer edge quality. The
gates that we currently have run from the sprue hole to the outer edge of each
of our pieces. This means that when we cut the gates off, the piece is usually either
left with a small nub of plastic along the outside, or a chunk of plastic cut
off along the outside. This gives the yoyo a rough surface finish that could
sometimes be quite sharp if not filed down. Our solution is to add internal
gates the run to the inner faces of our parts, which means the gates will never
be seen, thus we don’t need to be so precise when cutting them and also do not
have to file them down afterwards.


